19037229b 278.000 813717400 1876189 134*161*16 For DAF
Shaft Seal, crankshaft
Corteco 19037229B
DAF 1876189
Elring 278.000
Product Description
Size: 134-161-16
Shaft Seal, crankshaft
Corteco 19037229B
DAF 1876189
Elring 278.000


| DAF NO. | CORTECO NO. | DAF NO. | CORTECO NO. | DAF NO. | CORTECO NO. |
| 119468 | 12019583B | 1262887 | 12015933B | 1679051 | 12013896B |
| 140335 | 12014616B | 1271385 | 434842 | 1684105 | 19037229B |
| 140336 | 12015659B | 1275083 | 20029771B | 1684106 | 19037227B |
| 140540 | 12011306B | 1275084 | 15027586B | 1685767 | 01034446B |
| 140783 | 12013757B | 1278421 | 01015529B | 1700329 | 19034569B |
| 140784 | 12014736B | 1283668 | 01017058B | 1701778 | 01020480B |
| 204265 | 12010923B | 1287102 | 01027965B | 1704007 | 19036788B |
| 0240631 | 12014700B | 1287103 | 01029753B | 1705011 | 19036788B |
| 279535 | 01033484B | 1288043 | 01017792B | 1739947 | 01027965B |
| 0281986 | 12015531B | 1291086 | 01034594B | 1784507 | 01029609B |
| 292766 | 01015140B | 1295232 | 01029609B | 1813133 | 12019115 |
| 299521 | 01031578B | 1296692 | 12018806B | 1876189 | 19037229B |
| 0325321 | 12011019B | 1297604 | 01026691B | 1876190 | 19037227B |
| 0356343 | 01020393B | 1305982 | 01014602B | 3020183 | 19037226B |
| 0376992 | 01017057B | 1308855 | 12012713B | 3020186 | 19037226B |
| 0491901 | 12011826B | 1311187 | 12010750B | 3102798 | 12010952B |
| 0500162 | 01032389B | 1317286 | 12015096B | 3103825 | 12010924B |
| 0517151 | 12012930B | 1334961 | 01026332B | 3104047 | 12010923B |
| 534997 | 01031578B | 1335063 | 01026336B | 13915219 | 01019705B |
| 0538953 | 01017056B | 1340320 | 20029771B | 70224654 | 12011547B |
| 0558114 | 12015530B | 1340321 | 15027586B | 720165794 | 12010952B |
| 572372 | 12011026B | 1347260 | 12014451B | 820890924 | 12000129B |
| 0573145 | 01033754B | 1352849 | 01032391B | 100CP4697 | 12010795B |
| 0578507 | 12011359B | 1365084 | 20031582B | 100CP5148 | 01032392B |
| 584294 | 12011533B | 1365949 | 01032390B | 702246562 | 12011547B |
| 585373 | 12011340B | 1370127 | 20029771B | 702672445 | 19030094B |
| 0585903 | 12013896B | 1385519 | 01030095B | ACU6695 | 19034570B |
| 585910 | 12013365B | 1399472 | 12029817B | ACU9221 | 01020480B |
| 586697 | 12011331B | 1399566 | 19036369 | AJU1901 | 12011210B |
| 586784 | 19033956B | 1400074 | 12000548B | AMK4386 | 19034440B |
| 608590 | 12011306B | 1400080 | 01034436B | AMPA006 | 15034435B |
| 609458 | 12011307B | 1401069 | 01034649B | AMPA009 | 19034569B |
| 609475 | 12013757B | 1403960 | 12029818B | AMPA010 | 19034660B |
| 640978 | 01031960B | 1404510 | 01020480B | AMPA068 | 01034649B |
| 0647330 | 12000552B | 1404690 | 19034570B | AMPA352 | 19034569B |
| 0647330 | 12015029B | 1407706 | 19036300 | AMPA588 | 01029753B |
| 0657062 | 01012190B | 1409549 | 19036788B | AMPB584 | 19034569B |
| 662004 | 12000157B | 1409889 | 12020496B | CBU1200 | 19036788B |
| 0678157 | 01015143B | 1447221 | 12019250B | CBU2006 | 12019586B |
| 0681704 | 12015530B | 1450109 | 01032392B | CBU2482 | 12019586B |
| 0682961 | 12015530B | 1450110 | 01032053B | FBU5115 | 12019250B |
| 0683467 | 20034092B | 1450701 | 01034560B | FBU5116 | 01032053B |
| 0691048 | 01030337B | 1455398 | 01030101B | FBU5474 | 01032458B |
| 0692237 | 12015769B | 1456105 | 19035694B | FBU5520 | 12002188B |
| 693402 | 12011306B | 1456258 | 12011122B | FBU5521 | 01034650B |
| 693928 | 12013757B | 1456286 | 12013860B | FBU8317 | 01032392B |
| 0696084 | 12012235B | 1457008 | 20034092B | LBU8881 | 49354520 |
| 0698396 | 01034437B | 1457021 | 20029771B | NAK9256 | 12011826B |
| 699617 | 20016209B | 1534012 | 12020496B |  |
|
| 0757380 | 20031582B | 1602361 | 12011209B | ||
| 0815139 | 19031974B | 1604095 | 12011122B | 0015484 | 12013388B |
| 0893004 | 01019705B | 1608946 | 01032458B | 0015485 | 12013388B |
| 1226734 | 12014700B | 1609658 | 01034650B | 0066322 | 01020066B |
| 1228198 | 12012592B | 1610035 | 12016644 | 0077061 | 01019462B |
| 1235423 | 12032032B | 1610973 | 49355275 | 0077476 | 01017058B |
| 1238034 | 12015758B | 1615787 | 12015120B | 0077477 | 01017056B |
| 1242740 | 12011006B | 1616777 | 19034672B | 0077479 | 01016687B |
| 1242747 | 12011006B | 1622224 | 01020067B | 110466 | 12011307B |
| 1255264 | 01034647B | 1623190 | 01034638B | 110732 | 12011351B |
| 1256591 | 01002633B | 1658481 | 01031969B | 0110852 | 12009025B |
| 1256592 | 12011026B | 1674387 | 19035693B | 119198 | 12010859B |
| 1258777 | 12015096B | 1677419 | 12011122B | 119199 | 12010879B |
Professional Assembly of
PTFE oil seals
Modern diesel and gasoline engines make increasingly high demands
on oil seals. This is particularly due to the higher engine speed and oil
temperature. In addition, increasingly long maintenance intervals for
oil changes are required, which makes the utilized additive-rich oils
more aggressive toward the sealing material. Oil seals made from
fluoro rubber (FKM), which are often used, can only fulfill these in
creased demands to a limited extent.
The material polytetrafluorethylene (PTFE), however, provides a solution. PTFE oil seals do withstand
these extreme stresses since they
• have a considerably wider sealing overlay without metal spring
• are resistant to high temperatures and modern motor oils
• exhibit low friction losses
• offer very good sealing performance
In addition, PTFE enables the application in case of insufficient lubrication and dry run, as well as the
application with un-tempered shafts. The PTFE sealing lip and PTFE protective lip are directly moulded
on and can either point toward the inside or outside, depending on the respective assembly. Due to the
PTFE dry run qualities, oil or grease must NOT be used as an assembly agent.
For commercial vehicles, PTFE oil seals are used in
• crankshaft seals
• camshaft seals
• transmission seals
• wheel hub and axle seals
Professional assembly is especially important for the successful use of PTFE oil seals.
Please adhere to the following instructions:
• In most cases, the PTFE oil seal is equipped with a plastic cover in order
to protect the sensitive sealing lip. This also ensures the even geometri
cal shape of the sealing lip and its optimal alignment with the shaft sur
face. It is important to make sure that the cover will be removed for as
sembly—not earlier. The sensitive sealing lip must neither be moved nor
upended since this can negatively affect the sealing function, even with
out being obviously detectable.
• Before assembly of the oil seal, the shaft surface must be carefully in
spected to ascertain that it is free of grooves or other damages. If this is
not the case, these must be removed. If in doubt, it is absolutely neces
sary to consult an engine specialist/repairer who will possibly perform a
professional surface finishing, if needed.
• Important: The PTFE oil seal must be installed dry. Oil or grease
of any kind must NOT be used as an assembly agent.
• For assembly, the plastic cover is positioned such that the oil seal can
smoothly slide onto the shaft. An appropriate insertion tool must be used
when sliding or pressing the oil seal onto the shaft, and it must be en
sured that this occurs evenly and without impact load. Otherwise there is
a risk of damaging the sealing lip, and flawless sealing function is no
longer guaranteed.
• In order to guarantee that the high-performance PTFE oil seal will
optimally perform its function, a minimum of 4 hours, and in some cases
depending on engine application a minimum of 8 hours after assembly
should pass before the shaft is moved or rotated.
How Long Does a Crankshaft Seal Last?
The crankshaft seal is located in the crankshaft of your vehicle. The crankshaft converts rotary into linear motion. This means it uses the force created by the pistons in the engine to move in a circular motion so the vehicle’s wheels can turn. The crankshaft is housed in the crankcase, which is the largest cavity in the engine block. For the crankshaft to work properly, it must be completely lubricated with oil so it is free of friction. There are two crankshaft seals, one in the front and one in the back, which are known as the front main and rear main seals respectively.
Since the crankshaft needs to be lubricated, there are seals on both ends of the crankshaft that keep the oil from escaping. In addition, the seals help to prevent debris and contaminants from entering the crankshaft itself. If this happens, the crankshaft may become damaged or stop working.
The crankshaft seals are made from durable materials so they can stand up to the harsh environment of the crankshaft. The materials they are made out of may include silicon or rubber. Although they are designed to handle the high pressure and temperatures, they can become worn and damaged over time.
The front seal on the crankshaft can be found behind the main pulley. If the seal starts leaking, the oil will get onto the pulley and oil will get thrown onto the belts, steering pump, alternator, and anything else that is close to the area. The rear seal is located along the transmission. The process to replace a rear crankshaft seal is complicated so it is best left to a professional mechanic.
Since the crankshaft seal can go bad over time, it is a good idea for you to know the symptoms before it completely fails.
Signs your crankshaft seal needs to be replaced include:
. Engine oil leak or oil splattered on your engine
. Oil spraying on the clutch
. The clutch slipping because oil is spraying on the clutch
. Oil leaking from the front crank pulley
. The seal is an important part to keeping your crankshaft running smooth, and your crankshaft is necessary for your engine to run properly. Therefore, this repair should not be delayed.
How to Replacing the front crankshaft seal ?

Step 1: Prepare the vehicle. Jack the vehicle up high enough to obtain access to the harmonic balancer, which is located on the front of the motor and attached to the crankshaft. Secure it on jack stands.

Step 2: Remove the accessory drive belts. On many modern vehicles, there is an automatic, spring-loaded belt tensioner that can be rotated to loosen the belts.
You may need to use an open end wrench or ratchet handle depending on the design. Older vehicles, and even some newer ones, require you to loosen a mechanical tensioner.
Tip: Take a picture of the belt routing for future reference.

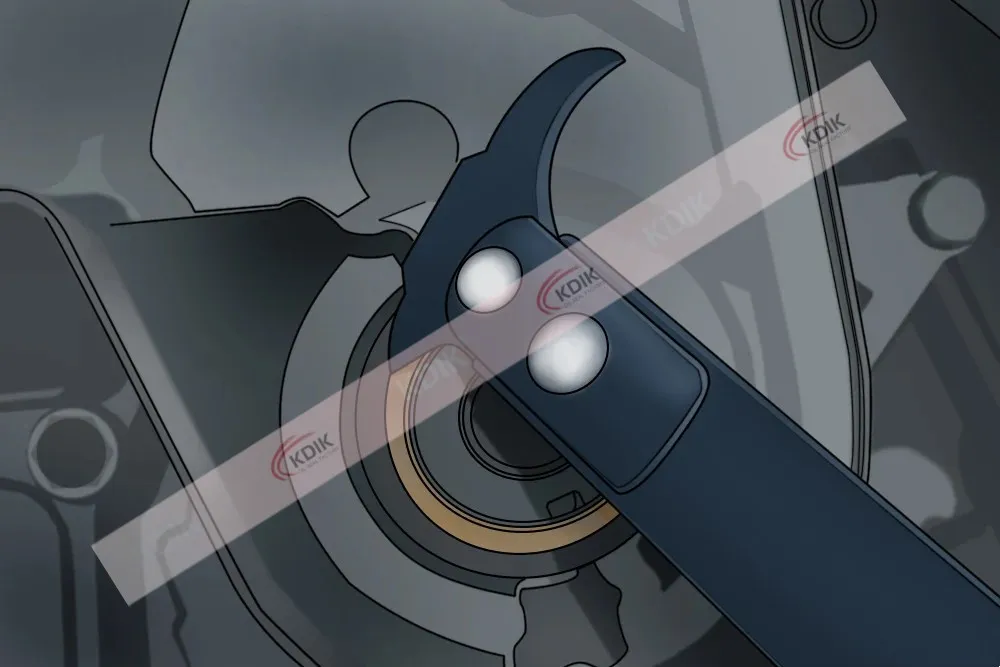
Step 3: Remove the harmonic balancer bolt. Remove the harmonic balancer bolt by using the strap wrench to hold the balancer still while loosening the bolt with a socket and ratchet handle or breaker bar. It will be very tight, so pull hard.

Step 4: Remove the harmonic balancer unit. Use the gear puller to remove the harmonic balancer unit. Place the hooks in an area that will not easily break, like the lip of the pulley section.

Some vehicles have threaded bolt holes in the balancer that can be used to attach a puller. Tighten the center bolt with a ratchet handle or breaker bar until the balancer breaks free.

- Tip: Most harmonic balancers are kept from rotating on the crankshaft by using a woodruff key. Don’t lose the woodruff key, as you will need it for reassembly.
 Step 5: Remove the old crankshaft seal. Using a seal puller, gently pry the old seal loose from the crankcase.
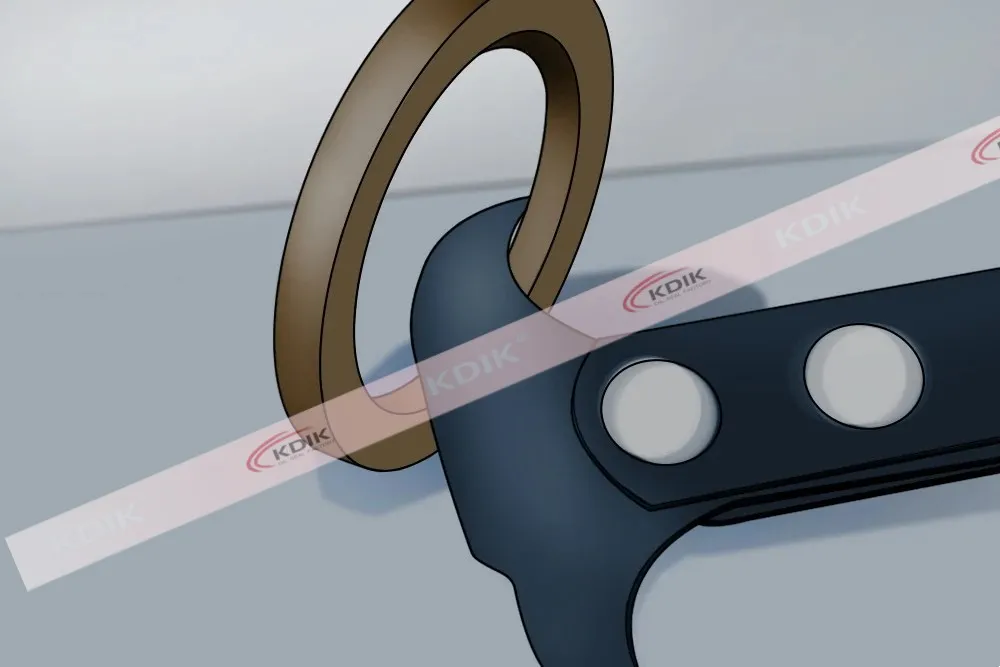 The objective is to try and hook onto the seal, between the seal and the crankshaft, and pry it loose. It may take several attempts at different positions to fully release the seal.
 Step 6: Install the new crankshaft seal. Lubricate the new seal with fresh motor oil to prevent tearing of the seal and to make installation easier. Then, position the seal with the lip towards the engine block and press it on by hand.
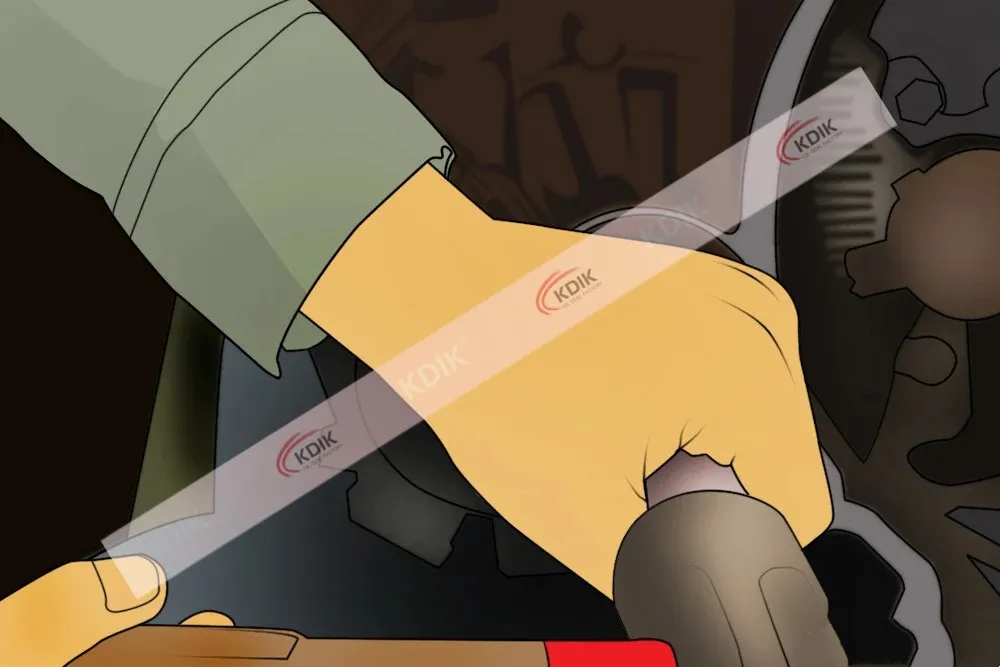 Place the seal over the crankshaft with a seal driver tool and use a dead blow hammer to gently tap the seal into place.
- Note: You can also use a large deep well socket or a pipe coupler as a seal driver if it has the same outside diameter as the seal itself.

Be sure that the new crankshaft seal looks properly installed.
Step 7: Install the new harmonic balancer. Align the woodruff key slot in the new balancer with the woodruff key and carefully slide the balancer onto the crankshaft, making sure the keyway remains in its proper position.
Install the center bolt and tighten until the required torque specification is obtained.
Step 8: Reinstall the belts. Rotate or loosen the belt tensioner to reinstall any accessory belts that were removed.
- Note: Refer to any pictures you took or your factory service manual to determine the correct belt routing.
Step 9: Lower the vehicle. After supporting the vehicle with the floor jack, carefully remove the jack stands and lower the vehicle. Start the vehicle to ensure proper reassembly and operation.
Replacing a crankshaft seal is doable if you follow the correct steps. However, if you are not comfortable performing such a task yourself, a certified technician, like one from kdik oil seals factory, will have the tools and skills required to complete the front crankshaft seal replacement for you
FAQ
Q1. What is the payment term?
A: We accept a T/T 30% deposit and a 70% balance of a current bill of lading or a letter of credit.
Q2. What is the normal delivery time for product orders?
A: The average delivery time of the sample is 1-2 weeks. If the mold production is involved, the delivery cycle of the production mold is 10 days, and the average production time after the sample is approved is 1-2 weeks.
Q3. What is your standard packaging?
A: All goods will be packed in PE bags and then packed in cartons and filled with trays. Special packaging methods are accepted when needed, but charges may apply.
Q4. Which certificate do you have?
A1: we have passed ISO, IATF still applying for more patents.
Q5: How to check the quality of bulk orders?
A1: Our inspection procedures include, first inspection/patrol inspection/initial inspection/full inspection/shipment inspection.
A2: We provide quality certification to all customers before delivery, such as measurement reports, material data sheets, etc. A3: We accept third party inspections such as SGS, TUV, INTERTEK, BV, etc.
Q6: How do I choose a raw compound for my application?
A: With years of experience in using a variety of materials, we can help you choose the material that best suits your needs, keeping in mind the cost of materials.
Q7: Can you provide materials of different colors?
A: Yes, we can produce custom molded rubber and silicone rubber products in different colors. Color codes are required when ordering.
Q8: From which side can you produce which materials?
A: NBR, EPDM, silicone, FKM, NEOPRENE (CR), NR, IIR, SBR, ACM, AEM, fluorosilicon (FVMQ), FFKM, liquid silica gel, and the like.